How to Enable All Cores on Windows 11? Have you ever wondered why some programs or games are running slowly on your computer even though you have a high-end processor? It’s possible that your computer is not utilizing all of its cores. In this blog post, we will discuss how to enable all cores on Windows 11 so that you can take full advantage of your processor’s performance.
What are Cores and Why are They Important?
Before we dive into how to enable all cores on Windows 11, let’s first understand what cores are and why they are important for your computer’s performance. In simple terms, a core is like a mini processor within your main processor. The more cores your processor has, the more tasks it can handle simultaneously. This is important for tasks that require a lot of processing power, such as gaming or video editing.
Check Your Processor’s Core Count
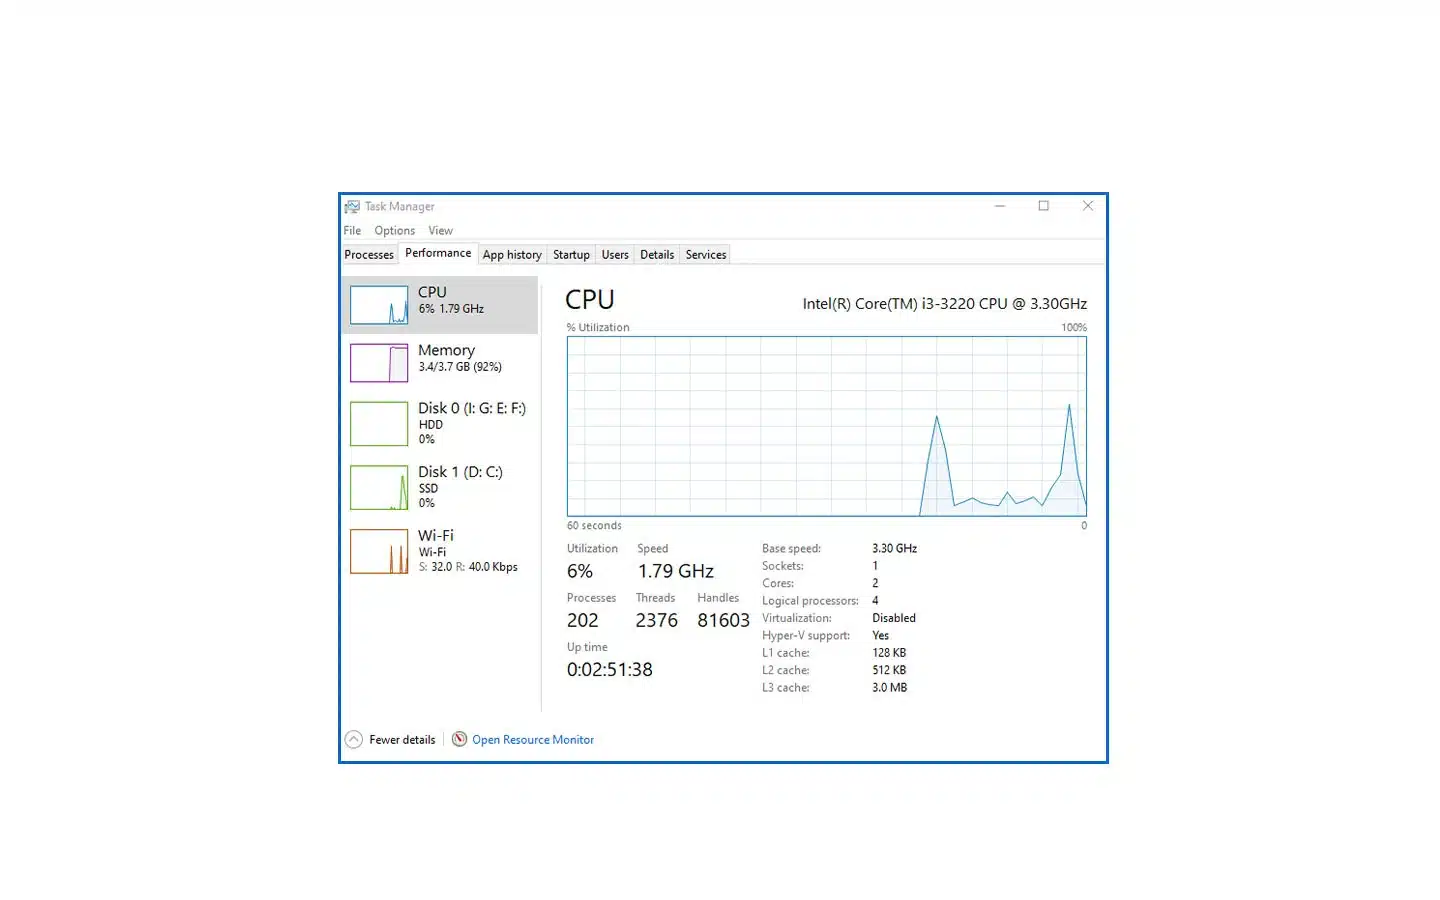
The first step in enabling all cores on Windows 11 is to check how many cores your processor has. To do this, right-click on the Start menu and select “Task Manager.” Under the Performance tab, you will see the number of cores and threads your processor has. If you have a high-end processor, you will likely have multiple cores, with each core having multiple threads.
Enable All Cores in BIOS
To enable all cores on Windows 11, you may need to make changes in your computer’s BIOS settings. Keep in mind that making changes in your BIOS can be risky, so proceed with caution and only make changes if you are confident in what you are doing. To access your BIOS settings, restart your computer and press the key indicated on the start-up screen (usually F2 or Delete). Once in the BIOS, navigate to “Advanced CPU Settings” or a similar option. Look for an option that says “Cores” or “Core Multiprocessing” and make sure it is enabled. Save your changes and exit the BIOS.
Adjust Power Settings

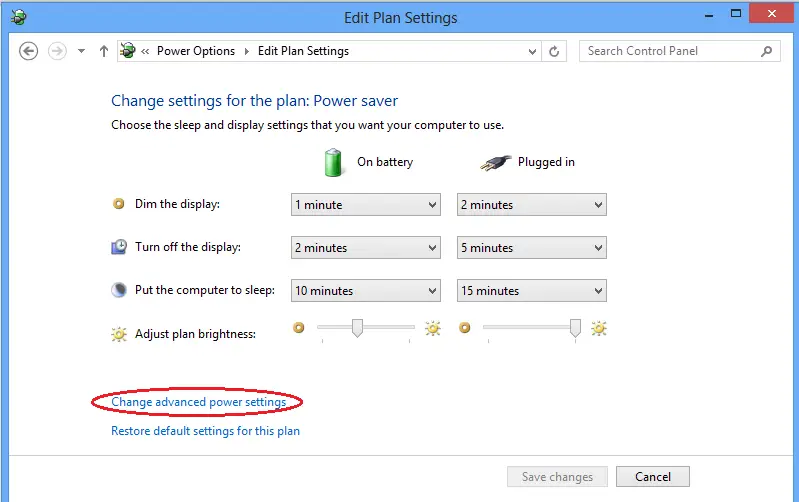
Another way to enable all cores on Windows 11 is by adjusting your computer’s power settings. By default, some power plans limit the number of cores that can be used to save energy. To change this, go to “Control Panel” and select “Power Options.” Click on “Change plan settings” for your chosen power plan, then select “Change advanced power settings.” Look for the option that says “Processor power management” and expand it. Then, expand the option that says “Maximum processor state” and make sure it is set to 100%. This ensures that all cores are being used at their maximum capacity.
Additional Tips For How to Enable All Cores on Windows 11?
- Keep your computer’s drivers up-to-date to ensure optimal performance
- Consider upgrading your processor if you notice consistently slow speeds even with all cores enabled
- Use task manager or other monitoring software to keep track of your processor’s performance and temperature
- Don’t forget to regularly clean your computer’s hardware, such as the fans and heat sink, to prevent overheating
- Consider overclocking your processor for even better performance, but only if you are familiar with the process and have proper cooling in place. Overall, remember that enabling all cores is just one aspect of optimizing your computer’s performance, so be sure to also take care of other maintenance tasks regularly. Happy computing! So go ahead and give it a try, and see the difference for yourself!Happy computiong!
Possible Risks
- Making changes in BIOS settings can potentially cause damage to your computer if not done correctly
- Overclocking your processor can also damage your hardware if not done correctly or safely
- Keep an eye on your computer’s temperature when enabling all cores, as using all cores at maximum capacity may cause overheating. It is important to monitor and adjust accordingly. Use caution and seek professional help if needed. Overall, always proceed with care when making changes to your computer’s settings, and always do thorough research beforehand. Happy computing! Overall, remember that enabling all cores is just one aspect of optimizing your computer’s performance, so be sure to also take care of other maintenance tasks regularly. Happy computing! So go ahead and give it a try, and see the difference for yourself!
Conclusion For How to Enable All Cores on Windows 11?
In conclusion, enabling all cores on Windows 11 is a simple but effective way to improve your computer’s performance. Whether you’re a gamer, content creator, or just a regular user, utilizing all of your processor’s cores can greatly enhance your experience. Just remember to proceed with caution and always monitor your computer’s temperature when making changes. With all cores enabled, you should see a noticeable improvement in your computer’s speed and responsiveness. So why wait? Go ahead and enable all cores on your Windows 11 computer today and take full advantage of its capabilities!Happy computing!
Additional Resources For How to Enable All Cores on Windows 11?
- Microsoft Support: How to Change the Number of Processors Used in Windows
- PCWorld: How to Overclock Your CPU for Free
- Digital Trends: How to Monitor System Performance in Windows 11
- How-To Geek: What Is Overclocking? The Beginner’s Guide to Understanding and Safely Using It.
Disclaimer
This document is intended for informational purposes only. We are not responsible for any damage or loss of data that may occur as a result of making changes to your computer’s settings. Always proceed with caution and seek professional help if needed. Happy computing! Overall, remember that enabling all cores is just one aspect of optimizing your computer’s performance, so be sure to also take care of other maintenance tasks regularly.
Happy Computing!
Thank you for reading this document and we hope it has been helpful in improving your computer’s performance. Remember to always stay informed and take care of your hardware to keep your computer running smoothly.
Related posts
Recent Posts
- Data Modeling with Microsoft Power BI O’Reilly: Practical Guide, AI, and Pricing July 30, 2025
- Power BI Workspace Roles & Access Levels: A Complete, Practical Guide (2025) July 25, 2025
- How Much Is a Power BI License? 2025 Best-Value Pricing Guide for Businesses July 20, 2025
- Power Apps vs Power BI in 2025: a complete guide to choosing, combining, and scaling the right solution July 15, 2025
- Power BI Embedded Pricing: 2025 Cost Playbook for Accurate Budgets and Confident Launches July 12, 2025
Blog Categories
Product categories
Best Selling
-
 Best Design Portfolio Websites For Professionals
£49.99 – £99.99Price range: £49.99 through £99.99
-
 Quikdaz | Worldwide Software Deals | Leading Digital Services
£1,650.00Original price was: £1,650.00.£1,499.99Current price is: £1,499.99. -
 QFolio | Personal DIVI Premium Portfolio Layout Pack
£14.99
-
 The domain name & Website petoranest.com is for Sale
£599.99
-
 Print Ready Be Kind T-shirt Design Template
£4.99
-
 Print Ready Born Free, Staying Brave T-shirt Design Template
£4.99
-
 Enjoy Shopify Frist 3 Days Free Trail and 1 USD Per Month For your First 3 Months
£0.00
-
 Flatsome | Multi-Purpose Responsive WooCommerce Theme Including License Key & Lifetime Updates
£59.00
-
 Betheme | Responsive Multipurpose WordPress & WooCommerce Theme Including License Key & Lifetime Updates
£59.00
-
 Avada | Website Builder For WordPress & eCommerce Including License Key & Lifetime Updates
£59.00Original price was: £59.00.£29.99Current price is: £29.99.
Categories
Best Selling
-
 Nitro PDF Pro 14 (PDF Editor) Official License Key For Lifetime
£179.99Original price was: £179.99.£29.99Current price is: £29.99. -
 Customize Name Official Microsoft Power Bi Pro Account For Lifetime
£199.00Original price was: £199.00.£54.99Current price is: £54.99. -
 Custom Username Office365 Pro Plus 1 Account For 5 Windows/Mac/Tablet With 100GB OneDrive Storage
£79.99Original price was: £79.99.£24.99Current price is: £24.99. -
 Customize Username Microsoft Office 365 Pro Plus 1 Account 5 Device for Windows, Mac, iOS With 6 Months Warranty
£75.99Original price was: £75.99.£19.99Current price is: £19.99. -
 Autodesk 2025 All Apps -3 Years Subscription (Your Own Email Activation)
£3,599.00Original price was: £3,599.00.£175.99Current price is: £175.99.


