Learn how to delete files on Microsoft 365 effortlessly with our step-by-step guide and expert tips for seamless file management. In this guide, we will walk you through the process of deleting files on Microsoft 365. Whether you want to free up space on your OneDrive or get rid of unnecessary files in SharePoint, we have got you covered. Whether you are using OneDrive, SharePoint, or any other application within Microsoft 365, the steps to delete a file remain the same. By the end of this guide, you will know exactly how to delete files on Microsoft 365 without any hassle. We will also cover some useful tips and tricks to help you manage your files more efficiently. So let’s get started!
Prerequisites of How to Delete Files on Microsoft 365
Before we begin, make sure you have a Microsoft 365 account and access to the application where the file you want to delete is located. It’s also recommended to have a basic understanding of how Microsoft 365 works. If you are new to Microsoft 365, we suggest checking out our other guides for beginners.
Step 1: Accessing the File
The first step is to access the file you want to delete. This can be done by opening the application where the file is located, such as OneDrive or SharePoint. Alternatively, you can also search for the file using the search bar at the top of your Microsoft 365 homepage. Once you have found the file, click on it to open it.
Step 2: Selecting the File
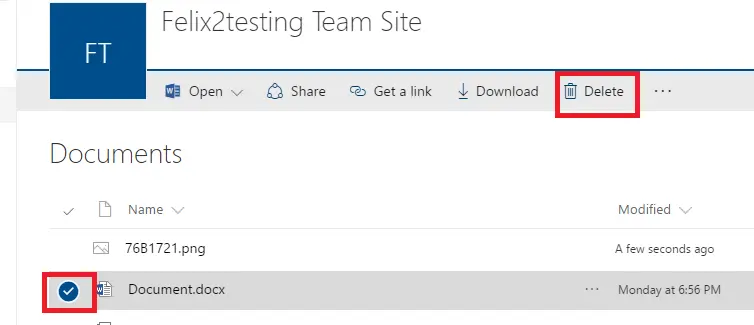
After opening the file, you will see various options at the top of your screen. Look for the “Delete” option and click on it. If you are using OneDrive, you may need to click on the three dots (…) next to the file and then select “Delete” from the drop-down menu.
Step 3: Confirming Deletion
A prompt will appear asking you to confirm if you want to delete the file. Read through the prompt carefully as it may also mention any related files or folders that will be deleted along with the selected file. Click on “Yes” to proceed with the deletion.
Step 4: File Successfully Deleted
Congratulations, you have successfully deleted the file! You will see a notification confirming the deletion. If you are using OneDrive, the deleted file will also be moved to your Recycle Bin where it can be permanently deleted or restored if needed.
Tips and Tricks for Managing Files on Microsoft 365
- Utilize the search bar to easily find and access files.
- Keep your files organized in folders to make deleting multiple files at once easier.
- Take advantage of the “Restore” option if you accidentally delete a file or change your mind about deleting it.
- Regularly check your Recycle Bin and empty it to free up space on your Microsoft 365 account.
- Use the “Version History” feature to access previous versions of a file and restore them if needed.
- Consider using third-party applications for more advanced file management features, such as bulk delete or automated file organization.
Conclusion of How to Delete Files on Microsoft 365
Deleting files on Microsoft 365 is a simple process that can be done in just a few clicks. By following the steps outlined in this guide, you can easily delete any unwanted files and keep your account organized. Remember to also utilize the tips and tricks mentioned to help you manage your files more efficiently. Thank you for reading, we hope this guide has been helpful! So go ahead and start decluttering your Microsoft 365 account now. Happy deleting!
Additional Resources For How to Delete Files on Microsoft 365
Related posts
Recent Posts
- Data Modeling with Microsoft Power BI O’Reilly: Practical Guide, AI, and Pricing July 30, 2025
- Power BI Workspace Roles & Access Levels: A Complete, Practical Guide (2025) July 25, 2025
- How Much Is a Power BI License? 2025 Best-Value Pricing Guide for Businesses July 20, 2025
- Power Apps vs Power BI in 2025: a complete guide to choosing, combining, and scaling the right solution July 15, 2025
- Power BI Embedded Pricing: 2025 Cost Playbook for Accurate Budgets and Confident Launches July 12, 2025
Blog Categories
Product categories
Best Selling
-
 Best Design Portfolio Websites For Professionals
£49.99 – £99.99Price range: £49.99 through £99.99
-
 Quikdaz | Worldwide Software Deals | Leading Digital Services
£1,650.00Original price was: £1,650.00.£1,499.99Current price is: £1,499.99. -
 QFolio | Personal DIVI Premium Portfolio Layout Pack
£14.99
-
 The domain name & Website petoranest.com is for Sale
£599.99
-
 Print Ready Be Kind T-shirt Design Template
£4.99
-
 Print Ready Born Free, Staying Brave T-shirt Design Template
£4.99
-
 Enjoy Shopify Frist 3 Days Free Trail and 1 USD Per Month For your First 3 Months
£0.00
-
 Flatsome | Multi-Purpose Responsive WooCommerce Theme Including License Key & Lifetime Updates
£59.00
-
 Betheme | Responsive Multipurpose WordPress & WooCommerce Theme Including License Key & Lifetime Updates
£59.00
-
 Avada | Website Builder For WordPress & eCommerce Including License Key & Lifetime Updates
£59.00Original price was: £59.00.£29.99Current price is: £29.99.
Categories
Best Selling
-
 Nitro PDF Pro 14 (PDF Editor) Official License Key For Lifetime
£179.99Original price was: £179.99.£29.99Current price is: £29.99. -
 Customize Name Official Microsoft Power Bi Pro Account For Lifetime
£199.00Original price was: £199.00.£54.99Current price is: £54.99. -
 Custom Username Office365 Pro Plus 1 Account For 5 Windows/Mac/Tablet With 100GB OneDrive Storage
£79.99Original price was: £79.99.£24.99Current price is: £24.99. -
 Customize Username Microsoft Office 365 Pro Plus 1 Account 5 Device for Windows, Mac, iOS With 6 Months Warranty
£75.99Original price was: £75.99.£19.99Current price is: £19.99. -
 Autodesk 2025 All Apps -3 Years Subscription (Your Own Email Activation)
£3,599.00Original price was: £3,599.00.£175.99Current price is: £175.99.
