Unlocking Your Torrent Potential: How to Allow uTorrent Through Firewall on Windows 11

Learn the essential steps on how to allow uTorrent through Firewall Windows 11 for seamless torrenting. Welcome to our blog on how to allow uTorrent through firewall on Windows 11. In today’s digital age, torrents have become an essential part of our online experience. They allow us to easily share and download large files such as videos, music, software, and more. uTorrent, in particular, is one of the most popular torrent clients with its user-friendly interface and fast download speeds. However, many Windows 11 users have reported issues with uTorrent not being able to connect or download files due to firewall restrictions. One of the most popular torrent clients is uTorrent, which offers a user-friendly interface and fast download speeds. However, sometimes uTorrent may encounter issues with your firewall on Windows 11, preventing it from working properly. In this blog, we will guide you through the steps to allow uTorrent through your firewall so you can unlock its full potential.
What is a Firewall?
Before we dive into how to allow uTorrent through firewall Windows 11, it’s important to understand what a firewall is. A firewall is a security system that monitors and controls incoming and outgoing network traffic. It acts as a barrier between your computer and the internet, preventing unauthorized access or malicious attacks from reaching your device. In simpler terms, a firewall acts as a virtual security guard for your computer.
Why is uTorrent Blocked by Firewall?
Now that we know what a firewall is, you may be wondering why it would block uTorrent. The most common reason for this is because torrenting involves peer-to-peer file sharing, which can be seen as a potential security risk. As a result, your firewall may block uTorrent from connecting to the internet or downloading files. This is done as a precautionary measure to protect your computer from any potential threats. As such, many firewalls have default settings that block torrent clients like uTorrent from connecting to the internet. This is done to protect your computer and network from potential threats.
How to Allow uTorrent Through Firewall Windows 11?

Learn the essential steps on how to allow uTorrent through Firewall Windows 11 for seamless torrenting. Now that we understand the importance of allowing uTorrent through firewall on Windows 11, let’s go through the steps to do so. Please note that these steps may vary slightly depending on your specific version of Windows 11.
- Open the Start menu and search for “Firewall”
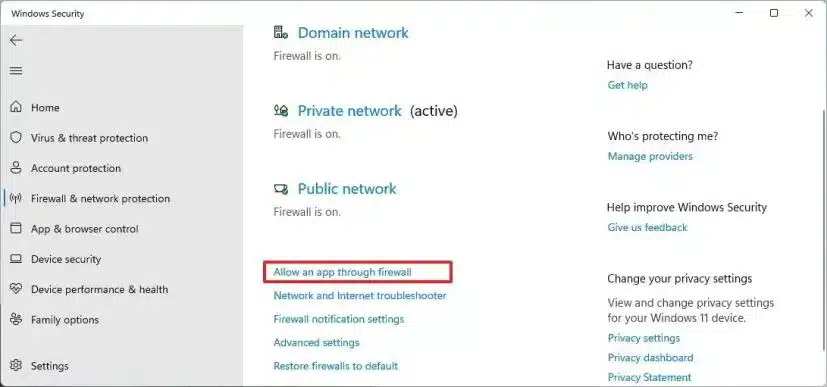
- Click on “Windows Security – Firewall & network protection”
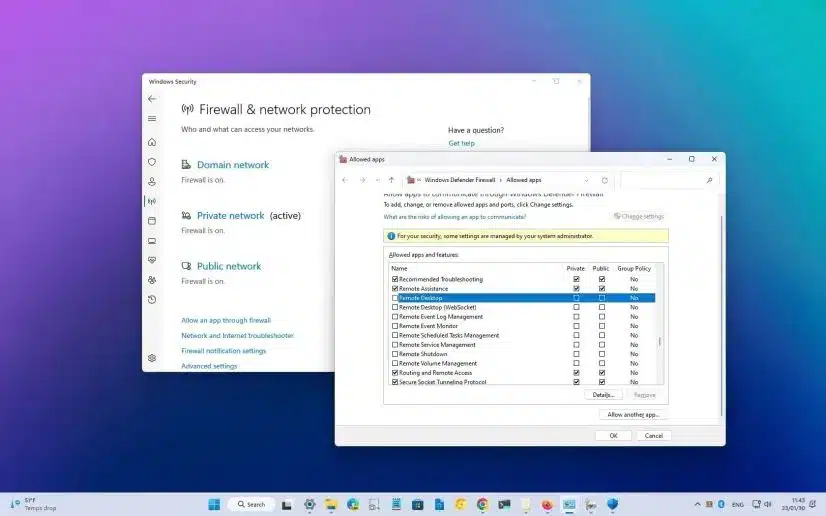
- In the new window, click on “Allow an app through firewall”
- Click on “Change settings” and then select “Allow another app”
- Choose uTorrent from the list of apps or click on “Browse” to manually locate it
- Check both options for private and public networks
- Click “Add”
- Repeat these steps for uTorrent Web if you also use that version
- Close the window and restart uTorrent for the changes to take effect
Congratulations! You have now allowed uTorrent through your firewall on Windows 11. This should resolve any issues with connectivity and improve the performance of uTorrent.
Tips for How to Allow uTorrent Through Firewall Windows 11
While allowing uTorrent through your firewall is essential, there are a few additional tips to keep in mind for a smoother torrenting experience:
- Keep your firewall and antivirus software updated to ensure maximum security
- Use a reliable VPN (virtual private network) when downloading or sharing torrents to protect your identity and data
- Regularly check and adjust your uTorrent settings for optimal performance
Conclusion of How to Allow uTorrent Through Firewall Windows 11
We hope this blog has helped you understand why it’s important to allow uTorrent through firewall on Windows 11 and how to do so. By following these steps and using our tips, you can unlock the full potential of uTorrent and enjoy seamless torrenting. Thank you for reading and happy downloading!
